This article provides step-by-step instruction on setting up an Anaconda ecosystem using Miniconda3 on Ubuntu 21.04 for Python development or Machine Learning studies. A Miniconda installer contains core Anaconda packages and the Conda package manager.
The instructions given are for a Ubuntu 21.04 system, but it should also work for Ubuntu 20.04 and other Ubuntu-compatible distributions with Pop!_OS inclusive.
Preparation
1: Get the latest Miniconda3 Linux 64-bit installer with Python 3.9 from https://docs.conda.io/en/latest/miniconda.html.
Setup & initial configuration
Run bash — from where the script file is placed (e.g. '~/Downloads') — with the '.sh' installation script:
$ bash Miniconda3-py39_4.10.3-Linux-x86_64.sh (1)
| 1 | The prompt symbol $ indicates that you are typing at a terminal emulator (e.g. Ubuntu Terminal). |
-
Press Enter.
-
Press the space bar to read More, or press Q to skip.
-
Type
yesand press Enter.
-
Press Enter.
-
Type
yesand then press Enter.
-
Done!
The base environment
When the installation is complete, restart your terminal. Notice the terminal prompt has changed with the environment name tag — here, (base) — prefixed.
Anaconda allows you to create multiple Conda environments with packages dedicated to specific Python versions and their dependencies. The above Miniconda3 installation configured one for you, namely, the base environment. It is also set to activate this environment whenever you start a new terminal.
which python3
/home/hawk/miniconda3/bin/python3
ll $(which python3)
lrwxrwxrwx 1 hawk hawk 9 Jul 23 14:51 /home/hawk/miniconda3/bin/python3 -> python3.9*
Here, we choose to activate a Conda environment only when we need one. Enter the following command to turn the auto-activation option off:
conda config --set auto_activate_base false
Start Ubuntu Terminal anew and see that the (base) tag is gone now.
In this manner, you can activate and deactivate a specific Conda environment, as illustrated below:
On entering:
On leaving:
(Optional) Conda exercise: Anaconda Navigator
Anaconda Navigator is a graphical user interface (GUI) included in Anaconda® distribution that allows you to launch applications and manage Conda packages/environments in a consolidated manner. But because we installed only the core Anaconda packages via Miniconda3, Anaconda Navigator is not included in the installation.
Let us create a new environment named "test" by entering from a terminal (It doesn’t matter whether you run it from within or outside a Conda environment):
$ conda create -n test
You can check the list of your Conda environments created so far by:
$ conda env list
# conda environments:
#
base                  *  /home/hawk/miniconda3
test                     /home/hawk/miniconda3/envs/test
To activate the test environment, enter:
$ conda activate test
(test) $ (1)
| 1 | The tagged prompt (test) $ indicates that you are inside a virtual environment; All other characters (e.g. hawk@solvercube:~Desktop) are omitted for brevity. |
Installing a package using the Conda package manager is easy. To install Anaconda Navigator, enter from a terminal:
(test) $ conda install anaconda-navigator
When the installation is complete, launch Anaconda Navigator by entering:
(test) $ anaconda-navigator &
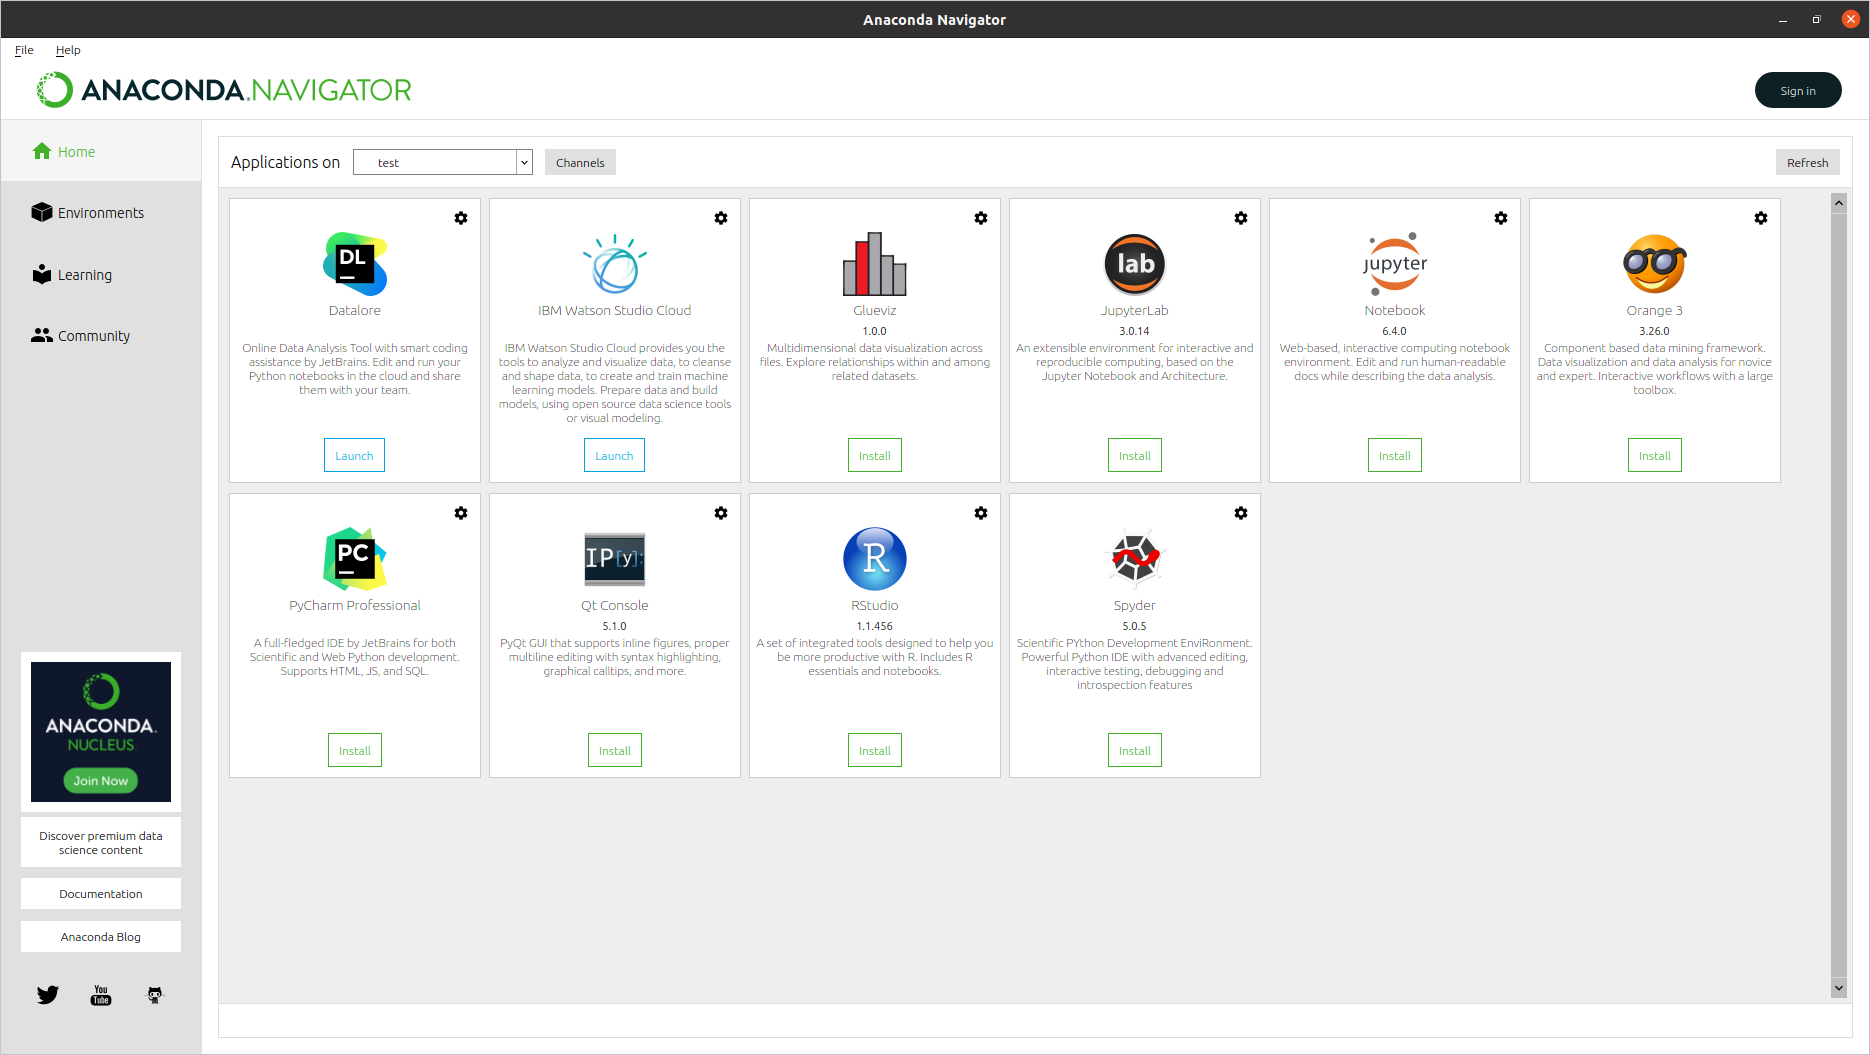
Main page:
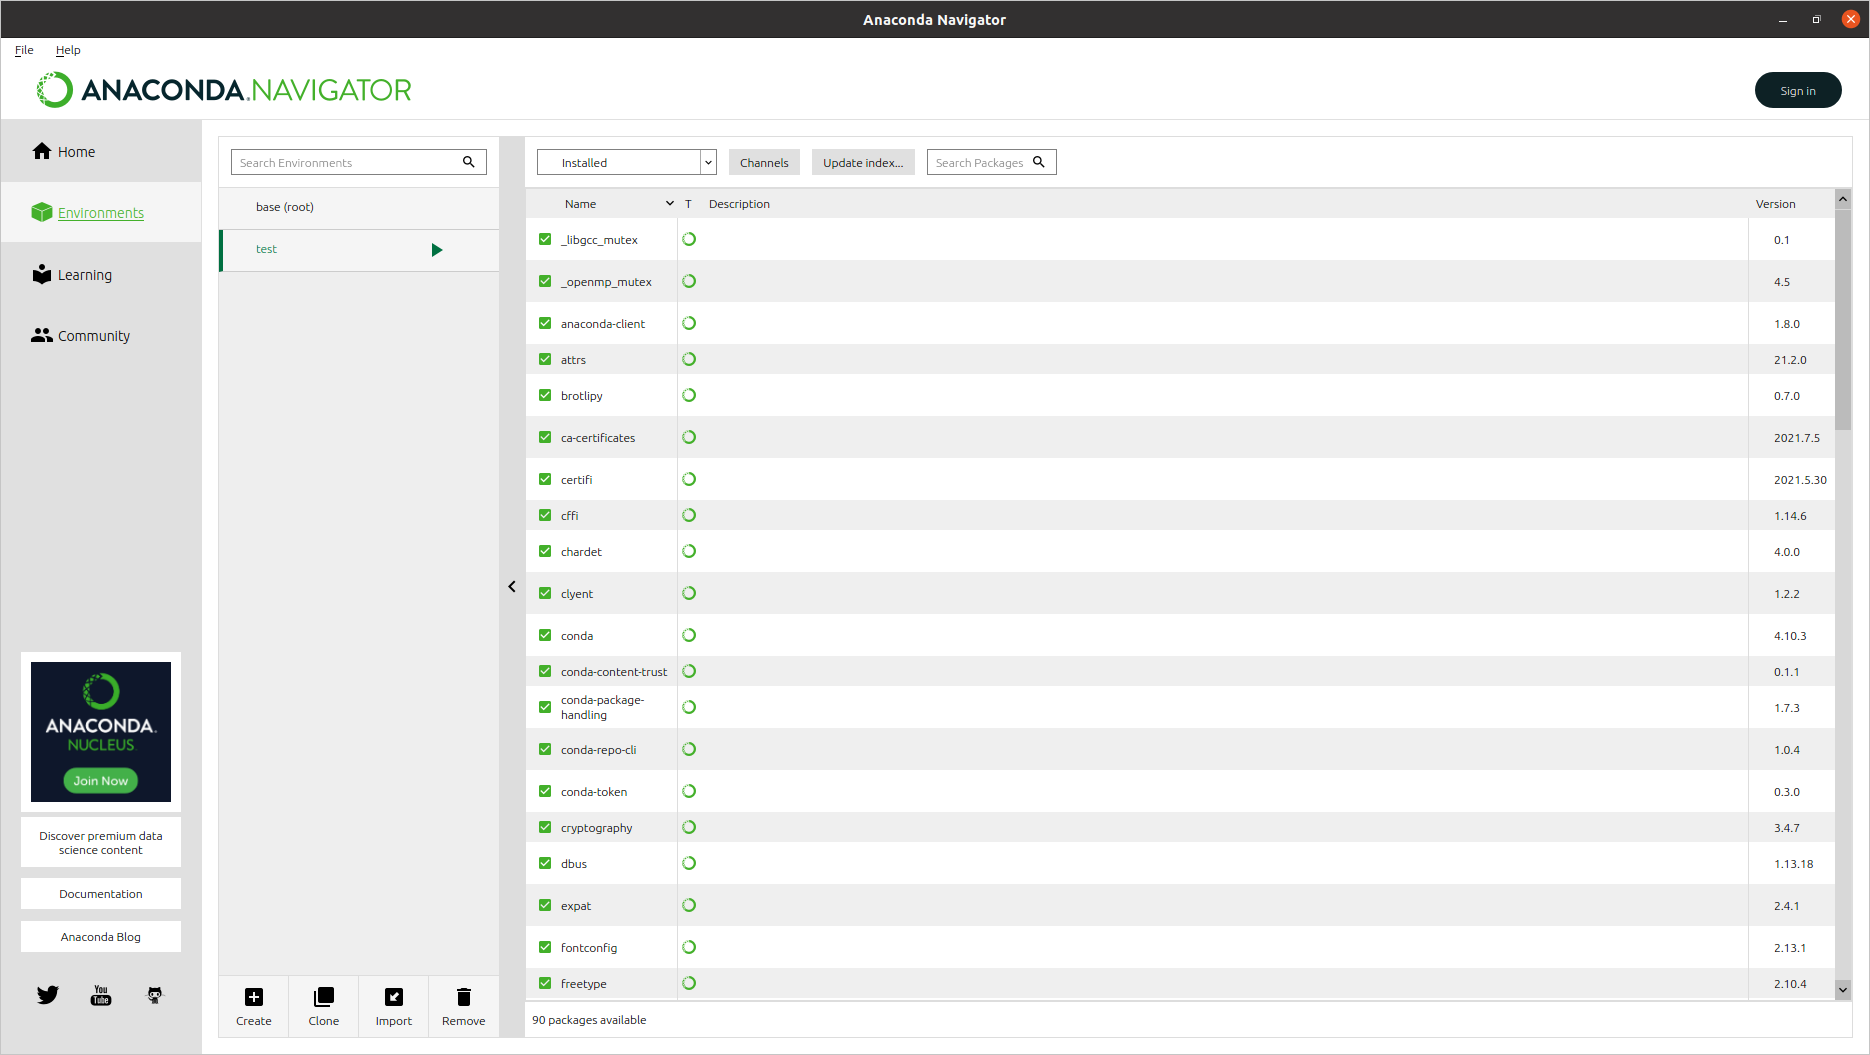
Environments page:
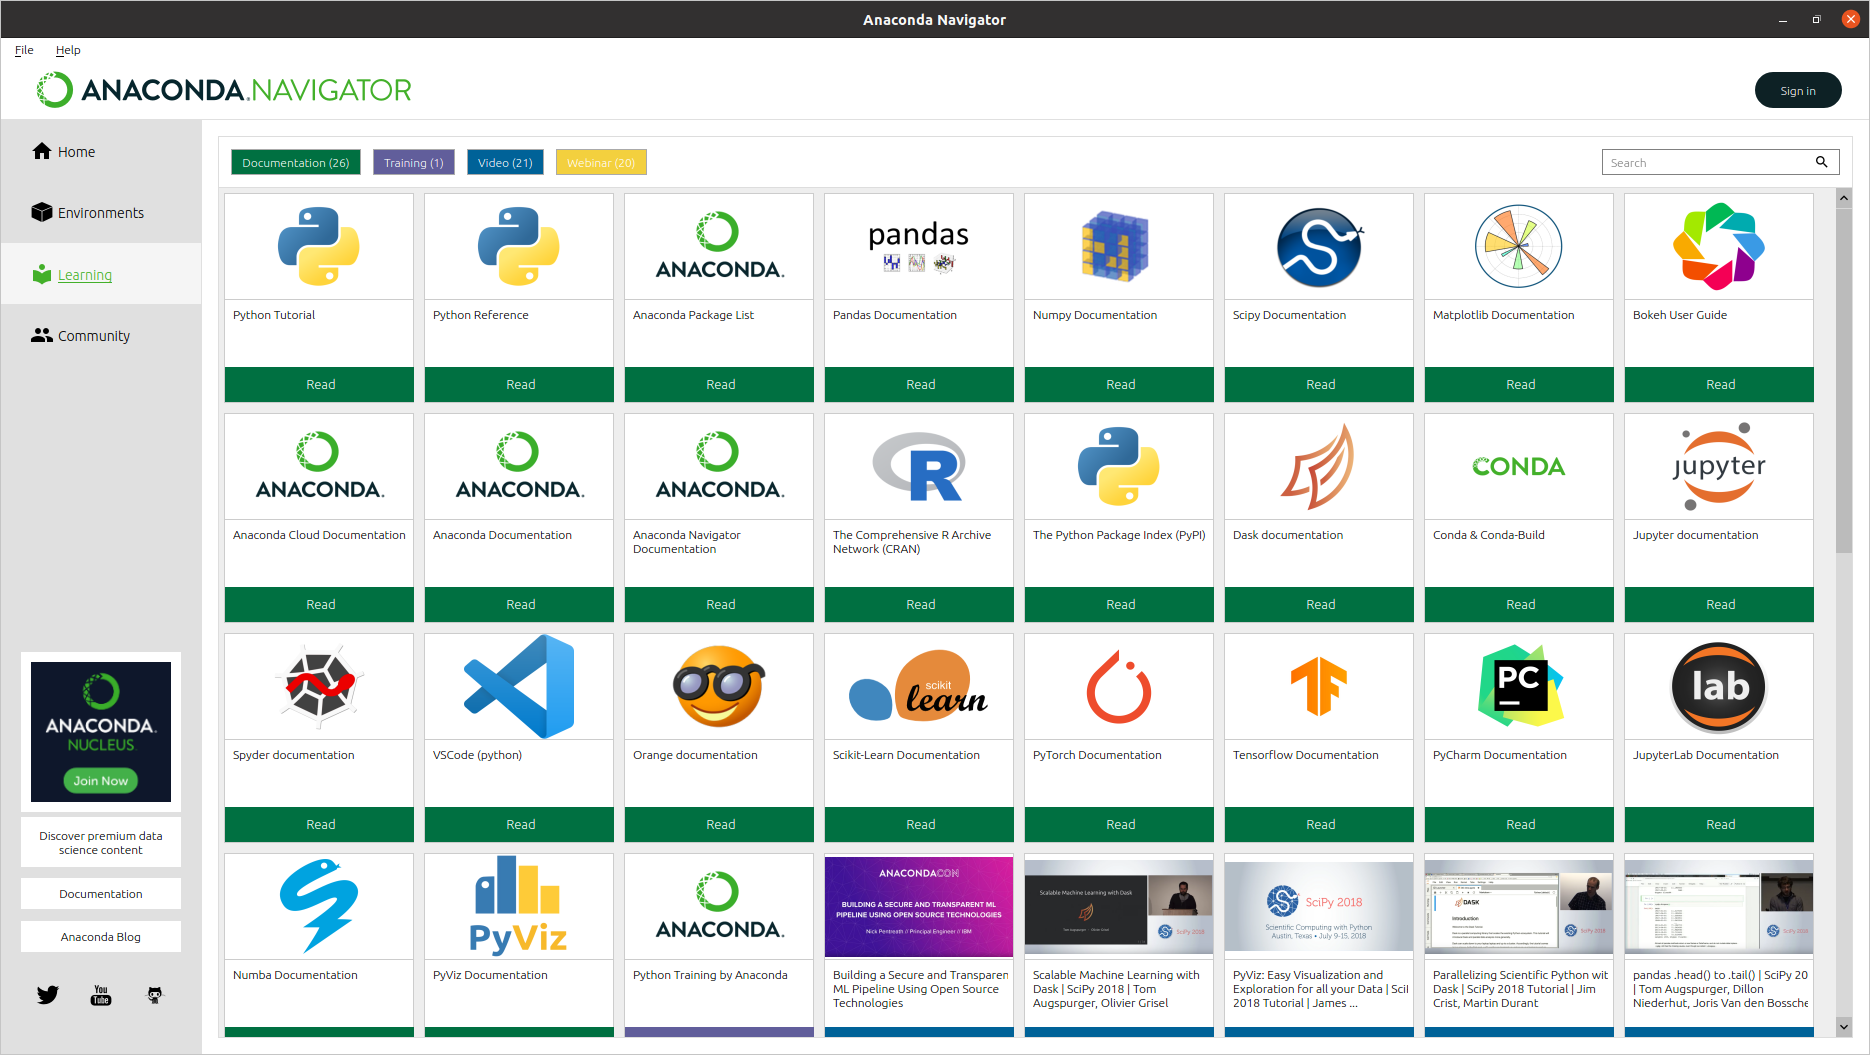
Learning page:
Community page:

To exit from Anaconda Navigator, select File > Quit — or click the window close button (x).
Here, I suppose that you would not need this graphical functionality for now. To uninstall Anaconda Navigator, enter:
(test) $ conda remove anaconda-navigator
Consequently, you would no longer need this test environment. You can delete the container as soon as you exit from it.
(test) $ conda deactivate
$ conda env remove -n test
Remove all packages in environment /home/hawk/miniconda3/envs/test:
"Hello, World!" using Spyder
Spyder is a powerful Python IDE (Integrated Development Environment) with advanced programming and interactive debugging features.
In this section, we will create a new Conda environment called "spyd", a Python workspace dedicated to the Spyder package and its dependencies.
$ conda create -n spyd
$ conda activate spyd
(spyd) $
Note that the above command conda create -n spyd prepared a "container" for a new Conda environment, but the command itself didn’t install anything.
(spyd) $ conda list
# packages in environment at /home/hawk/miniconda3/envs/spyd:
#
# Name                    Version                   Build  Channel
It is also worth noting that these containers are not isolated from the host-level environment, meaning any programs in your system PATH can be launched unless the same name exists in a specific Conda environment. For instance, if you search for your Python interpreter from this empty container, it will bring what your system installation has:
(spyd) $ ll $(which python3)
lrwxrwxrwx 1 root root 9 Jul 13 22:38 /usr/bin/python3 -> python3.9*
Now, from the spyd environment, install the Spyder package by entering:
(spyd) $ conda install spyder
This command will search for the latest Spyder version suitable to your environment and install it along with its dependencies (including a proper Python interpreter).
(spyd) $ ll $(which python3)
lrwxrwxrwx 1 hawk hawk 9 Jul 23 15:08 /home/hawk/miniconda3/envs/spyd/bin/python3 -> python3.9*
The version number of your Spyder can be checked by:
(spyd) $ conda list spyder*
# packages in environment at /home/hawk/miniconda3/envs/spyd:
#
# Name                    Version                   Build  Channel
pyls-spyder               0.3.2              pyhd3eb1b0_0
spyder                    5.0.5            py39h06a4308_2
spyder-kernels            2.0.5            py39h06a4308_0
When the installation is complete, run Spyder by entering:
(spyd) $ spyder &
| On the first launch, let us dismiss any distracting actions suggested — e.g. version upgrade, extension installations, etc — for the time being. |
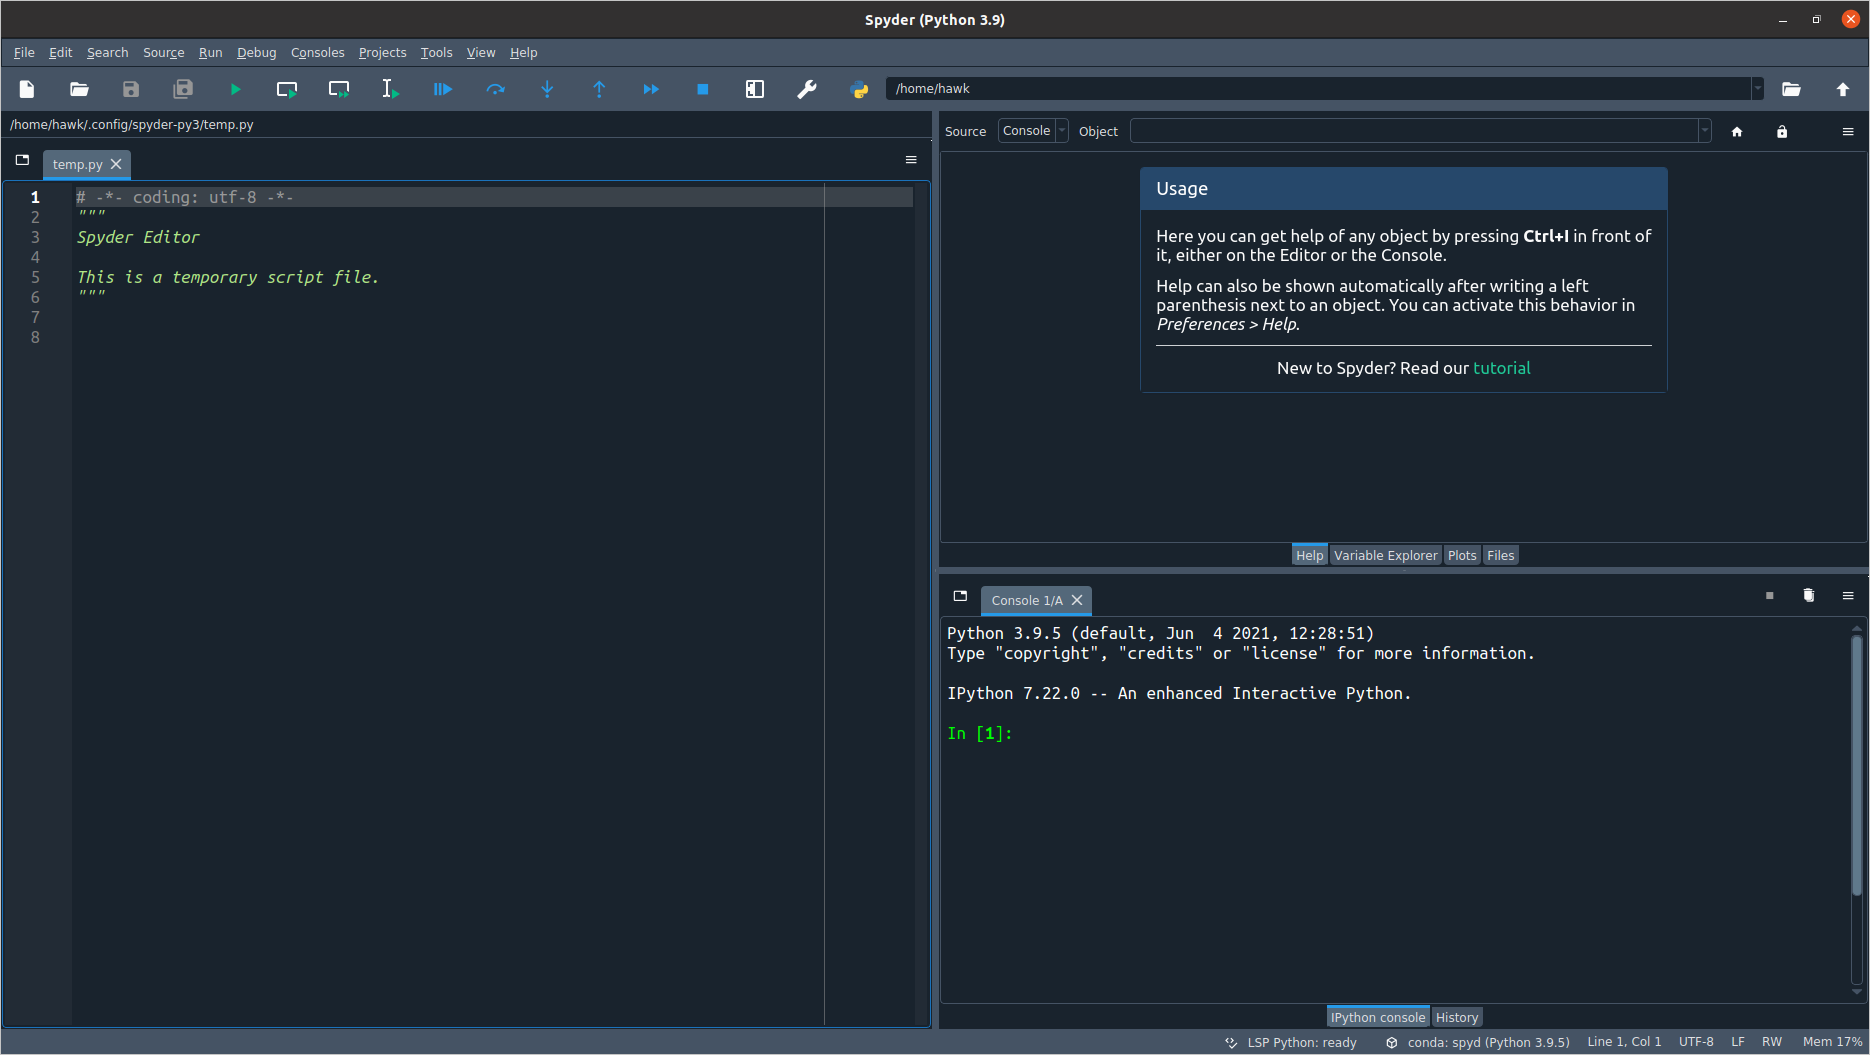
From the edit pane (labelled "temp.py"), clear the existing header lines — press Ctrl+A from inside the pane to select all and then Delete. Now, enter the following line instead:
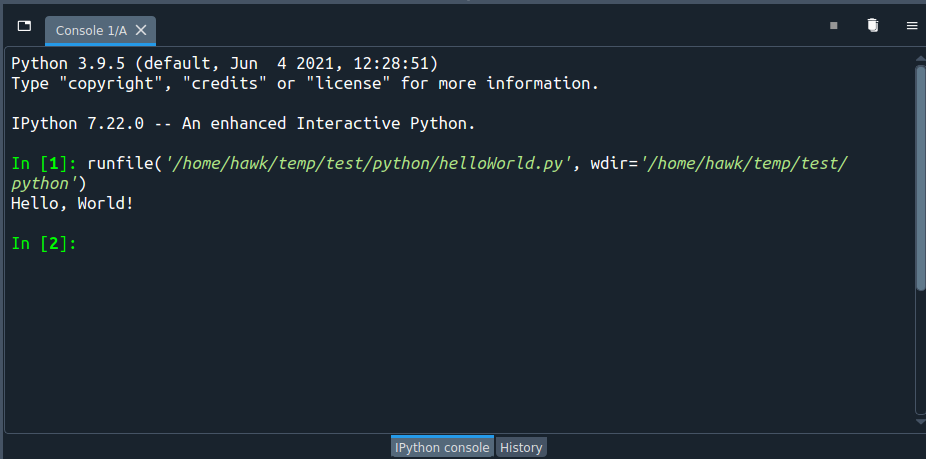
print("Hello, World!")Save it to a local work folder with a name, say, "helloWorld.py" by.
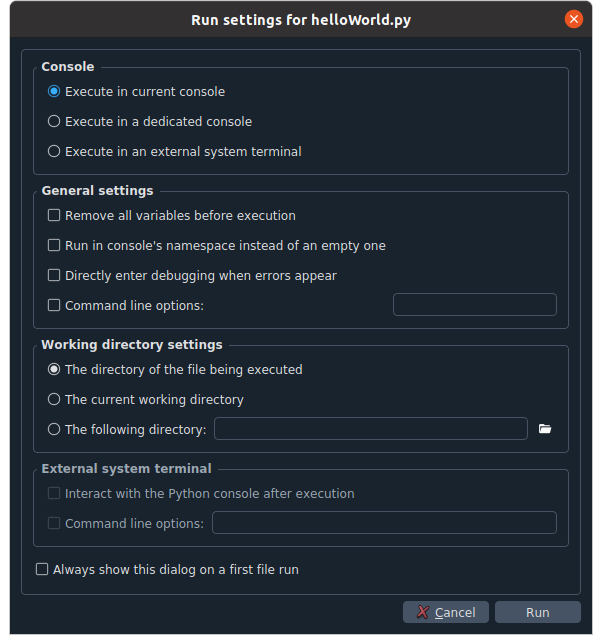
Press F5 to run the code. Executing a file for the first time will invoke a configuration dialog; Keep the default setting and then click Run.
Check the result from the IPython console pane in the lower right quadrant.
After checking Spyder works fine, exit from it by clicking , or by clicking the window close button as we need two (2) additional packages to perform a more practical task.
Basic plotting using NumPy & Matplotlib
In this section, we will learn how to generate a basic plot using NumPy and Matplotlib, two of the most commonly employed packages for much scientific computing.
(spyd) $ conda install numpy matplotlib
Start Spyder again, and enter the following lines in the editing area. Save it to a name, say, "myFirstPlot.py", and then press the F5 key to run it.
 1
 2
 3
 4
 5
 6
 7
 8
 9
10
11
12
13
14
15
import numpy as np
import matplotlib.pyplot as plt

x = np.linspace(0.,10.,100)
y1 = np.sin(x)
y2 = np.cos(2*x)

fig = plt.figure()

plt.plot(x,y1,label='sin(x)')
plt.plot(x,y2,label='cos(2*x)')

plt.legend(loc='upper left')

plt.show()
First, check the IPython console if there were any error, and then click the Plots button in the upper pane to see the rendered image.
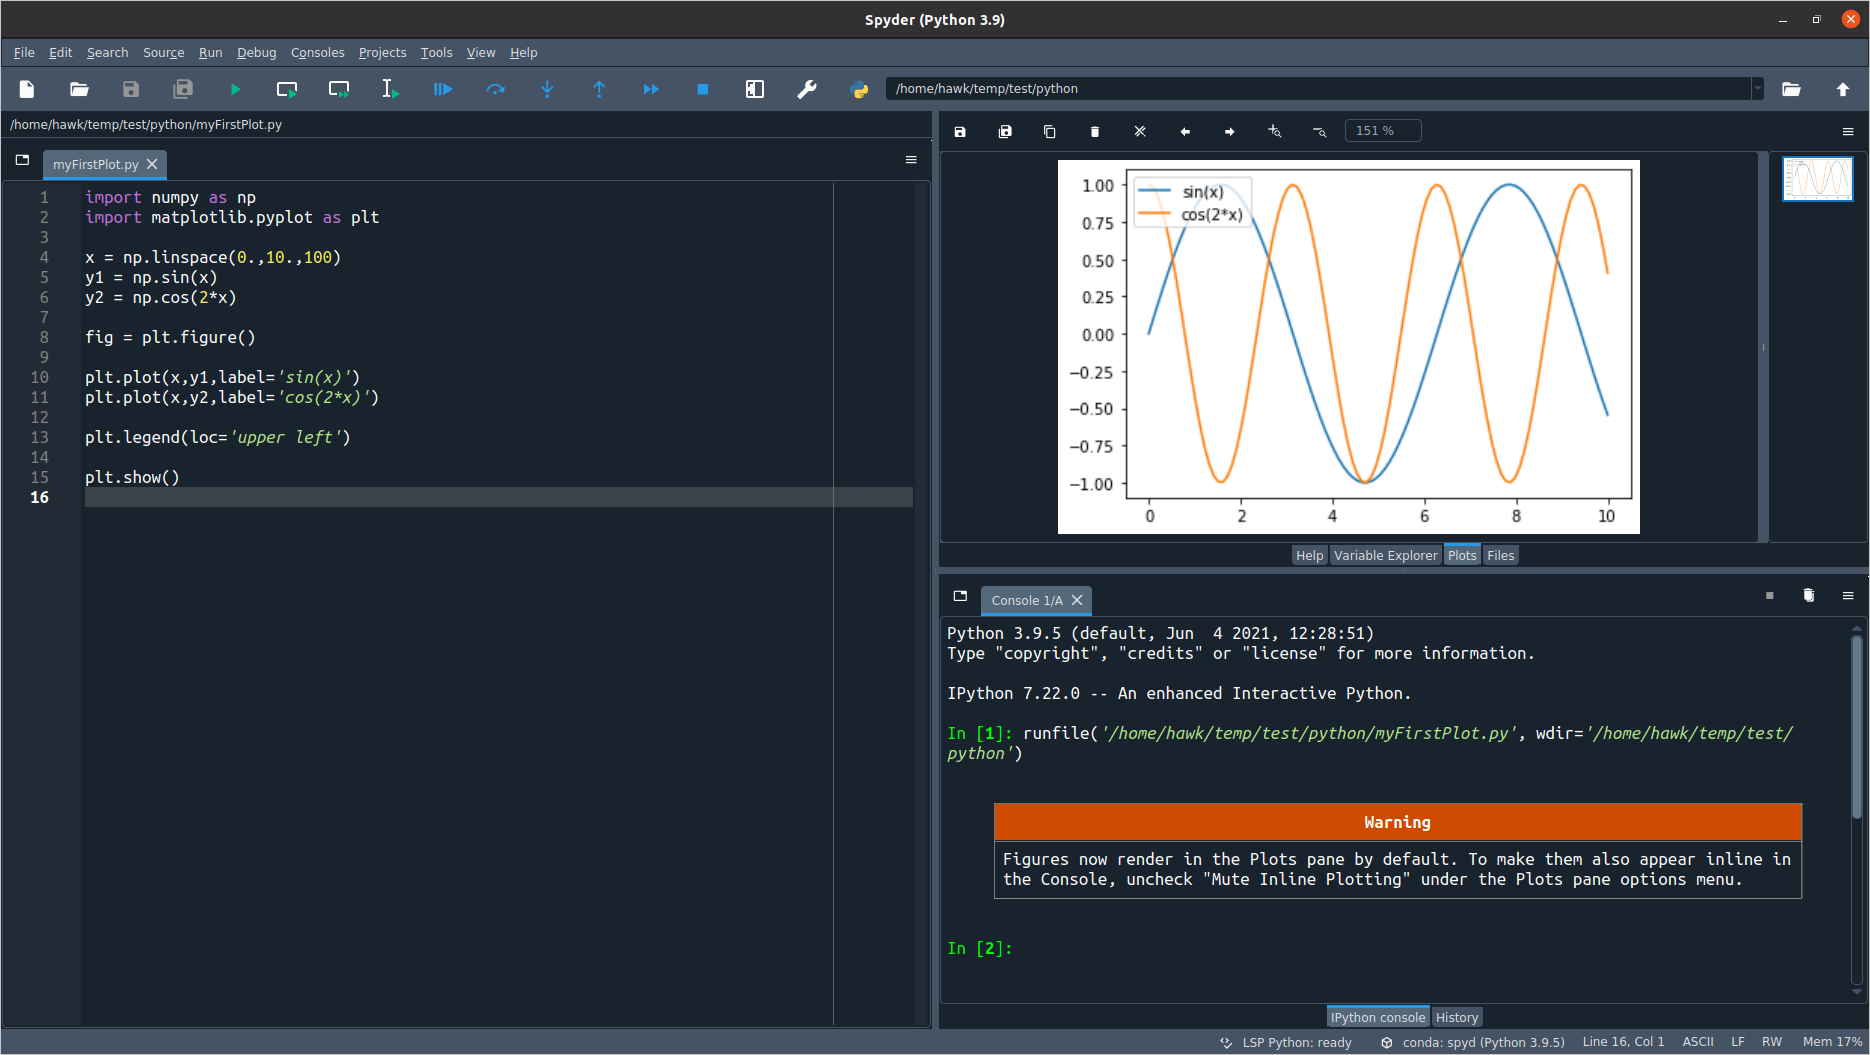
Note the new Spyder 5 now directs you to the Plot tab on creating a graph — i.e. without having to click it afterwards.
|
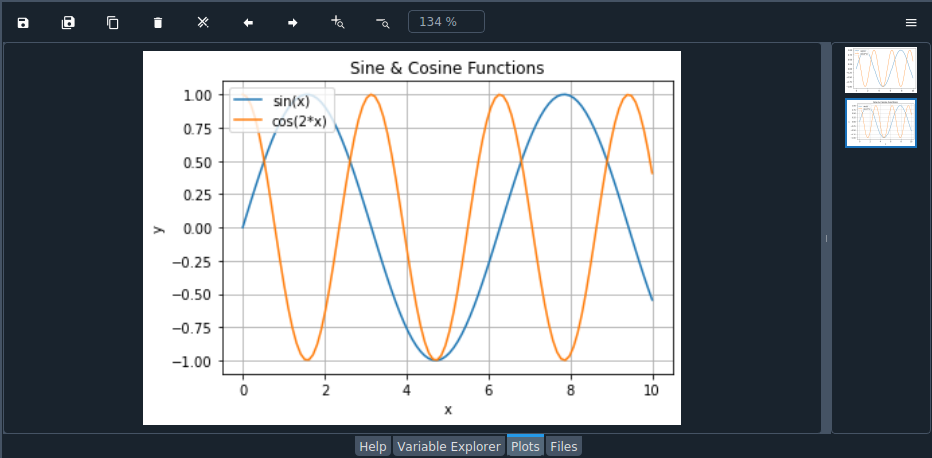
Let us wrap up this section by adding axes labels and the main title for the plot.
 1
 2
 3
 4
 5
 6
 7
 8
 9
10
11
12
13
14
15
16
17
18
19
20
21
22
import numpy as np
import matplotlib.pyplot as plt

x = np.linspace(0.,10.,100)
y1 = np.sin(x)
y2 = np.cos(2*x)

fig = plt.figure()

axs = fig.add_subplot(1,1,1)
axs.set_xlabel('x')
axs.set_ylabel('y')

plt.plot(x,y1,label='sin(x)')
plt.plot(x,y2,label='cos(2*x)')

plt.grid(True)
plt.title('Sine & Cosine Functions')

plt.legend(loc='upper left')

plt.show()
Epilogue
Notes on Conda channels
Conda channels refer to remote locations (i.e. URLs) from where you can download Anaconda packages. For example, if you search for NumPy or Matplotlib from Anaconda.org, you will find out there are not a single but many channels providing the same package. In case you want to download your package other than Anaconda’s internal mirroring channel, you need to specify the channel name, as in:
conda install -c conda-forge numpy matplotlib
Note however that the same package can exist at slightly different versions prepared by each channel maintainer. Although you may freely use multiple channels, casually mixing them within a single environment might cause some issues. For example, I would avoid such things as:
conda install numpy
conda install -c conda-forge matplotlib
unless I have a solid reason for doing it.
Cleaning unused packages?
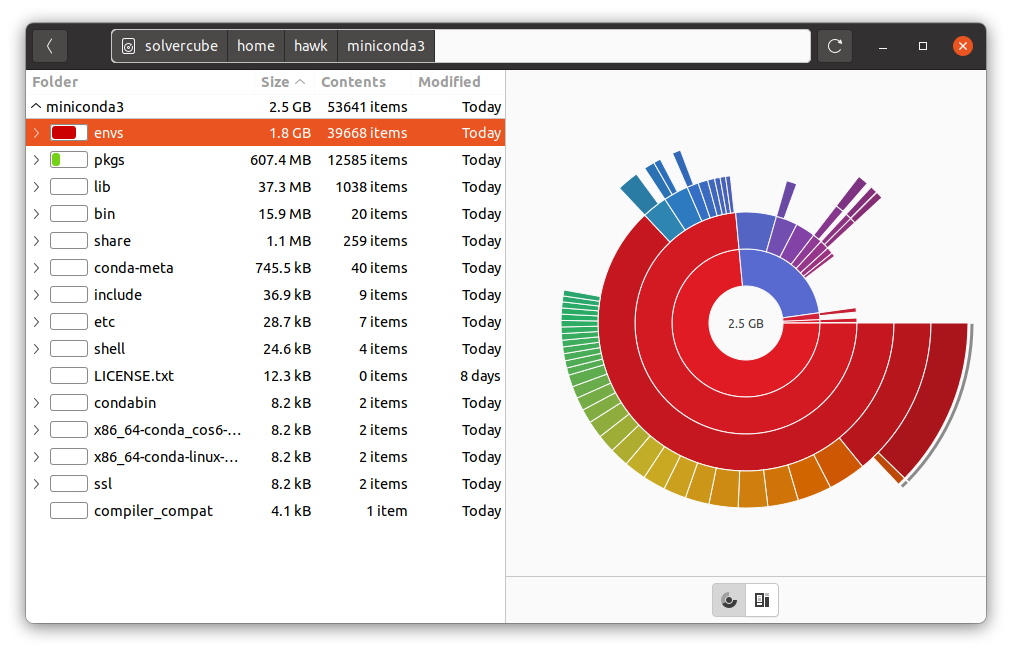
Installing the Miniconda3 distro alone took me about 300 MB of disk space (that is, this is your base size). I wondered how big it became after installing the Spyder, Numpy, and matplotlib packages (plus their dependencies).
Running Ubuntu’s Disk Usage Analyser reveals the size of my 'miniconda3' directory reads 2.5 GB.
I wondered why this big? To see individual packages in the spyd environment, enter:
(spyd) $ conda list
# packages in environment at /home/hawk/miniconda3/envs/spyd: # # Name Version Build Channel _libgcc_mutex 0.1 main _openmp_mutex 4.5 1_gnu alabaster 0.7.12 pyhd3eb1b0_0 appdirs 1.4.4 py_0 argh 0.26.2 py39h06a4308_0 arrow 0.13.1 py39h06a4308_0 astroid 2.6.5 py39h06a4308_0 async_generator 1.10 pyhd3eb1b0_0 atomicwrites 1.4.0 py_0 attrs 21.2.0 pyhd3eb1b0_0 autopep8 1.5.6 pyhd3eb1b0_0 babel 2.9.1 pyhd3eb1b0_0 backcall 0.2.0 pyhd3eb1b0_0 binaryornot 0.4.4 pyhd3eb1b0_1 black 19.10b0 py_0 blas 1.0 mkl bleach 3.3.1 pyhd3eb1b0_0 brotlipy 0.7.0 py39h27cfd23_1003 ca-certificates 2021.7.5 h06a4308_1 certifi 2021.5.30 py39h06a4308_0 cffi 1.14.6 py39h400218f_0 chardet 4.0.0 py39h06a4308_1003 click 8.0.1 pyhd3eb1b0_0 cloudpickle 1.6.0 py_0 cookiecutter 1.7.2 pyhd3eb1b0_0 cryptography 3.4.7 py39hd23ed53_0 cycler 0.10.0 py39h06a4308_0 dbus 1.13.18 hb2f20db_0 decorator 5.0.9 pyhd3eb1b0_0 defusedxml 0.7.1 pyhd3eb1b0_0 diff-match-patch 20200713 py_0 docutils 0.17.1 py39h06a4308_1 entrypoints 0.3 py39h06a4308_0 expat 2.4.1 h2531618_2 flake8 3.9.0 pyhd3eb1b0_0 fontconfig 2.13.1 h6c09931_0 freetype 2.10.4 h5ab3b9f_0 future 0.18.2 py39h06a4308_1 glib 2.69.0 h5202010_0 gst-plugins-base 1.14.0 h8213a91_2 gstreamer 1.14.0 h28cd5cc_2 icu 58.2 he6710b0_3 idna 2.10 pyhd3eb1b0_0 imagesize 1.2.0 pyhd3eb1b0_0 importlib-metadata 3.10.0 py39h06a4308_0 importlib_metadata 3.10.0 hd3eb1b0_0 inflection 0.5.1 py39h06a4308_0 intel-openmp 2021.3.0 h06a4308_3350 intervaltree 3.1.0 py_0 ipykernel 5.3.4 py39hb070fc8_0 ipython 7.22.0 py39hb070fc8_0 ipython_genutils 0.2.0 pyhd3eb1b0_1 isort 5.9.2 pyhd3eb1b0_0 jedi 0.17.2 py39h06a4308_1 jeepney 0.7.0 pyhd3eb1b0_0 jinja2 2.11.3 pyhd3eb1b0_0 jinja2-time 0.2.0 pyhd3eb1b0_2 jpeg 9b h024ee3a_2 jsonschema 3.2.0 py_2 jupyter_client 6.1.12 pyhd3eb1b0_0 jupyter_core 4.7.1 py39h06a4308_0 jupyterlab_pygments 0.1.2 py_0 keyring 23.0.1 py39h06a4308_0 kiwisolver 1.3.1 py39h2531618_0 lazy-object-proxy 1.6.0 py39h27cfd23_0 lcms2 2.12 h3be6417_0 ld_impl_linux-64 2.35.1 h7274673_9 libffi 3.3 he6710b0_2 libgcc-ng 9.3.0 h5101ec6_17 libgomp 9.3.0 h5101ec6_17 libpng 1.6.37 hbc83047_0 libsodium 1.0.18 h7b6447c_0 libspatialindex 1.9.3 h2531618_0 libstdcxx-ng 9.3.0 hd4cf53a_17 libtiff 4.2.0 h85742a9_0 libuuid 1.0.3 h1bed415_2 libwebp-base 1.2.0 h27cfd23_0 libxcb 1.14 h7b6447c_0 libxml2 2.9.12 h03d6c58_0 lz4-c 1.9.3 h2531618_0 markupsafe 1.1.1 py39h27cfd23_0 matplotlib 3.3.4 py39h06a4308_0 matplotlib-base 3.3.4 py39h62a2d02_0 mccabe 0.6.1 py39h06a4308_1 mistune 0.8.4 py39h27cfd23_1000 mkl 2021.3.0 h06a4308_520 mkl-service 2.4.0 py39h7f8727e_0 mkl_fft 1.3.0 py39h42c9631_2 mkl_random 1.2.2 py39h51133e4_0 mypy_extensions 0.4.3 py39h06a4308_0 nbclient 0.5.3 pyhd3eb1b0_0 nbconvert 6.1.0 py39h06a4308_0 nbformat 5.1.3 pyhd3eb1b0_0 ncurses 6.2 he6710b0_1 nest-asyncio 1.5.1 pyhd3eb1b0_0 numpy 1.20.3 py39hf144106_0 numpy-base 1.20.3 py39h74d4b33_0 numpydoc 1.1.0 pyhd3eb1b0_1 olefile 0.46 py_0 openjpeg 2.3.0 h05c96fa_1 openssl 1.1.1k h27cfd23_0 packaging 21.0 pyhd3eb1b0_0 pandocfilters 1.4.3 py39h06a4308_1 parso 0.7.0 py_0 pathspec 0.7.0 py_0 pcre 8.45 h295c915_0 pexpect 4.8.0 pyhd3eb1b0_3 pickleshare 0.7.5 pyhd3eb1b0_1003 pillow 8.3.1 py39h2c7a002_0 pip 21.1.3 py39h06a4308_0 pluggy 0.13.1 py39h06a4308_0 poyo 0.5.0 pyhd3eb1b0_0 prompt-toolkit 3.0.17 pyh06a4308_0 psutil 5.8.0 py39h27cfd23_1 ptyprocess 0.7.0 pyhd3eb1b0_2 pycodestyle 2.6.0 pyhd3eb1b0_0 pycparser 2.20 py_2 pydocstyle 6.1.1 pyhd3eb1b0_0 pyflakes 2.2.0 pyhd3eb1b0_0 pygments 2.9.0 pyhd3eb1b0_0 pylint 2.9.3 py39h06a4308_1 pyls-black 0.4.6 hd3eb1b0_0 pyls-spyder 0.3.2 pyhd3eb1b0_0 pyopenssl 20.0.1 pyhd3eb1b0_1 pyparsing 2.4.7 pyhd3eb1b0_0 pyqt 5.9.2 py39h2531618_6 pyrsistent 0.18.0 py39h7f8727e_0 pysocks 1.7.1 py39h06a4308_0 python 3.9.5 h12debd9_4 python-dateutil 2.8.2 pyhd3eb1b0_0 python-jsonrpc-server 0.4.0 py_0 python-language-server 0.36.2 pyhd3eb1b0_0 python-slugify 5.0.2 pyhd3eb1b0_0 pytz 2021.1 pyhd3eb1b0_0 pyxdg 0.27 pyhd3eb1b0_0 pyyaml 5.4.1 py39h27cfd23_1 pyzmq 20.0.0 py39h2531618_1 qdarkstyle 3.0.2 pyhd3eb1b0_0 qstylizer 0.1.10 pyhd3eb1b0_0 qt 5.9.7 h5867ecd_1 qtawesome 1.0.2 pyhd3eb1b0_0 qtconsole 5.1.0 pyhd3eb1b0_0 qtpy 1.9.0 py_0 readline 8.1 h27cfd23_0 regex 2021.7.6 py39h7f8727e_0 requests 2.25.1 pyhd3eb1b0_0 rope 0.19.0 pyhd3eb1b0_0 rtree 0.9.7 py39h06a4308_1 secretstorage 3.3.1 py39h06a4308_0 setuptools 52.0.0 py39h06a4308_0 sip 4.19.13 py39h2531618_0 six 1.16.0 pyhd3eb1b0_0 snowballstemmer 2.1.0 pyhd3eb1b0_0 sortedcontainers 2.4.0 pyhd3eb1b0_0 sphinx 4.0.2 pyhd3eb1b0_0 sphinxcontrib-applehelp 1.0.2 pyhd3eb1b0_0 sphinxcontrib-devhelp 1.0.2 pyhd3eb1b0_0 sphinxcontrib-htmlhelp 2.0.0 pyhd3eb1b0_0 sphinxcontrib-jsmath 1.0.1 pyhd3eb1b0_0 sphinxcontrib-qthelp 1.0.3 pyhd3eb1b0_0 sphinxcontrib-serializinghtml 1.1.5 pyhd3eb1b0_0 spyder 5.0.5 py39h06a4308_2 spyder-kernels 2.0.5 py39h06a4308_0 sqlite 3.36.0 hc218d9a_0 testpath 0.5.0 pyhd3eb1b0_0 text-unidecode 1.3 py_0 textdistance 4.2.1 pyhd3eb1b0_0 three-merge 0.1.1 pyhd3eb1b0_0 tinycss 0.4 pyhd3eb1b0_1002 tk 8.6.10 hbc83047_0 toml 0.10.2 pyhd3eb1b0_0 tornado 6.1 py39h27cfd23_0 traitlets 5.0.5 pyhd3eb1b0_0 typed-ast 1.4.3 py39h7f8727e_1 typing_extensions 3.10.0.0 pyh06a4308_0 tzdata 2021a h52ac0ba_0 ujson 4.0.2 py39h2531618_0 unidecode 1.2.0 pyhd3eb1b0_0 urllib3 1.26.6 pyhd3eb1b0_1 watchdog 2.1.3 py39h06a4308_0 wcwidth 0.2.5 py_0 webencodings 0.5.1 py39h06a4308_1 wheel 0.36.2 pyhd3eb1b0_0 whichcraft 0.6.1 pyhd3eb1b0_0 wrapt 1.12.1 py39he8ac12f_1 wurlitzer 2.1.1 py39h06a4308_0 xz 5.2.5 h7b6447c_0 yaml 0.2.5 h7b6447c_0 yapf 0.31.0 pyhd3eb1b0_0 zeromq 4.3.4 h2531618_0 zipp 3.5.0 pyhd3eb1b0_0 zlib 1.2.11 h7b6447c_3 zstd 1.4.9 haebb681_0
I tried to clean unused(?) packages by:
(spyd) $ conda clean --yes --all
It cleaned a bit from the 'pkgs' folder but none from the 'envs'.
Observation so far suggests some points to remember:
1: Setting up a Conda environment means you install the core Anaconda packages and libraries — no matter whether you would use it or not.
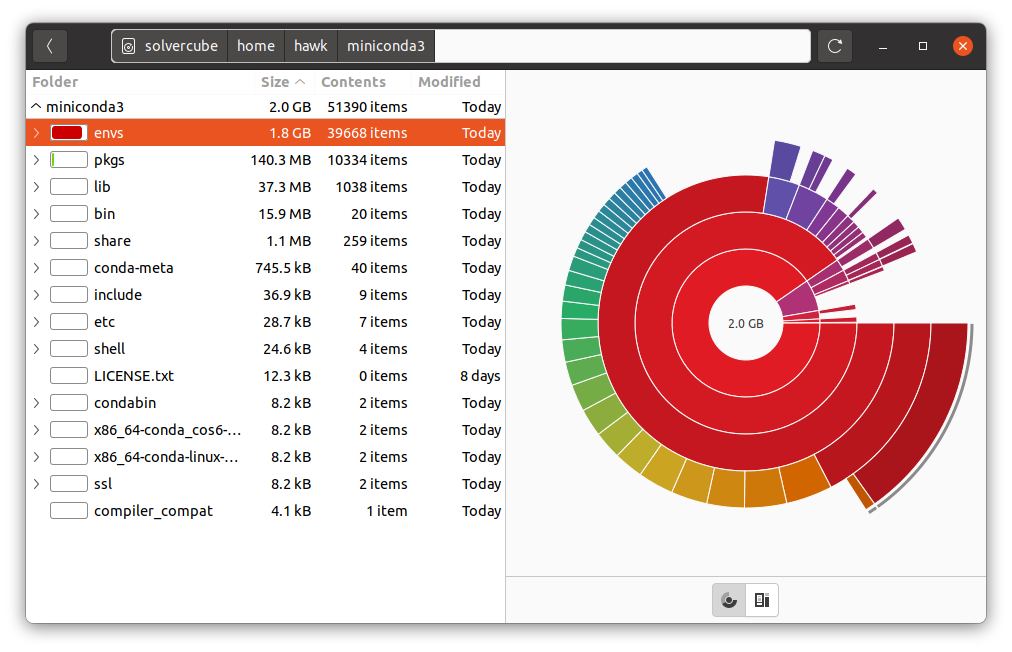
2: By the "unused" packages in using the command conda clean --yes --all, it means ones that do not belong to any environment. If, for example, you remove the spyd environment and run this command again, then it will delete the unused packages/libraries and return to the initial disk size of about 300 MB.
More importantly, the Conda package manager does quite a job handling various packages and libraries across multiple environments. If you experiment with creating another environment and install Spyder, NumPy, and Matplotlib, the total disk size will only increase by about 130 MB.
du -hsc ~/miniconda3/envs/*
1.8G	/home/hawk/miniconda3/envs/spyd
129M	/home/hawk/miniconda3/envs/test2
1.9G	total